How to Change Region on iPhone
If you’re moving to a new country and want to download Apps, Music, Books or Movies available in your new country, you need to change the region on your iPhone.
However, there are many things to take care of before you do it. You need to cancel subscriptions, leave Family Sharing, update software, and more.
1. Go to Settings
You may want to change region on iPhone because you are moving abroad or just need to access certain apps that are available in a different country. Whatever the reason, it is important to understand how to do this without losing your subscriptions and Family Sharing accounts.
The first step to changing your iPhone’s country and App Store is to go to Settings. Once you are there, scroll down to the General section and tap Language & Region. From there, you can select the new country and update your settings.
This process is easy, but it requires that you have a valid payment method and billing address for the new country. Also, it will affect all the content that you purchase through the iTunes Store or App Store on your iPhone or iPad.
Another thing to note is that it’s important to clear out any pending Apple ID balance or store credit, as these will not transfer over to your new country and you’ll need to spend them all before you can switch regions.
After you’ve done these things, it’s time to change your Apple ID region. When you do, your payment information will change and any subscriptions or Family Sharing groups that were associated with your old country will be deleted.
You’ll need to create a new Apple ID and add it to the iTunes Store and App Store in the new country to complete this task. It’s a bit of a pain to have to create a new Apple ID, but it can be worth the trouble for many people who need to change regions.
2. Tap on Apple ID
You can change the region of your Apple ID on an iPhone if you’ve moved to another country. This can be useful if you want to purchase apps and media that are only available in your new country, or if you want to use an app store from a different country.
To do this, you’ll need to sign into your Apple ID and tap on View Apple ID. You may be asked to log in with Touch or Face ID. Once you’re logged in, select your new country or region and review the Terms and Conditions. Once you’ve reviewed the terms, tap Agree to confirm your selection.
Next, you’ll need to set up a valid payment method for your new country or region. Most people choose Apple Card, but you can also choose PayPal, most credit cards, or your Apple Account balance.
If you’re not sure which payment methods are available in your new country or region, visit the Apple Support website.
Before you change your Apple ID’s country or region, make sure to download all of the apps and media you purchased with your current account, complete any subscriptions, and spend your Apple ID balance. You should also backup all of your purchases on a computer so that you can restore them in case you lose access to your Apple ID account.
After you change your Apple ID’s region, you’ll no longer be able to buy apps or media from the old country’s iTunes and App Store. To avoid this issue, you can try signing out of the App Store and then back in using your original Apple ID.
3. Tap on Account
If you are moving to a new country or want to download apps, music, books, and movies that are available in a different region, changing your App Store country is a good idea. But before you change the country associated with your Apple ID, there are a few things that you need to do.
First, you need to make sure that you clear off any pending Apple ID balance or store credit before you try to change the country/region of your App Store account. This is because balances don’t carry over to another country/region.
Second, you need to cancel any subscriptions like Apple Music or TV+ that are still active on your Apple ID account. You also need to cancel memberships, pre-orders for media, Season Passes, and other content purchases that you have in place.
Finally, you need to update your payment information and billing address for your new country/region. This is particularly important if you plan to use a credit card from your new country/region for iTunes and App Store purchases.
To change your Apple ID account region, tap on Account in the Settings menu and select your preferred country/region. You may need to enter your Apple ID password or use Touch or Face ID to confirm the changes.
When you have completed the process, tap Agree to confirm the change. Once you do, you’ll be able to shop in your new country/region. Before you do, though, you should check the Terms of Service for your new country/region to ensure that you aren’t violating Apple’s rules.
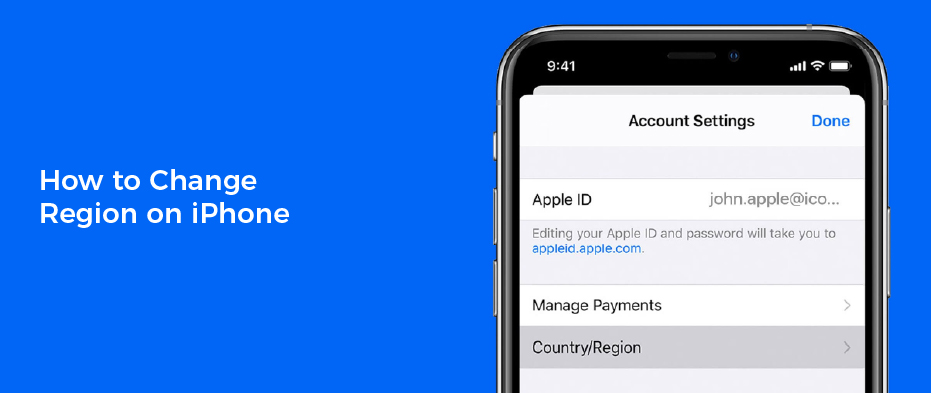
4. Tap on Country/Region
If you want to change region on your iPhone, the first thing you need to do is open Settings. In the General section, tap on Language & Region. Once you do this, you will be able to choose the country that you would like to use on your iPhone.
You may have moved to another country and would like to install local apps on your iPhone. Or, maybe you have come across an app that hasn’t been released in your current country yet and would like to try it out.
Changing the App Store and iTunes region on your iPhone can be useful, but it can also cause some problems. For example, it can affect your subscriptions and pre-orders, or even cause a loss of your store credit.
So, it’s important to take care of all the details before making the change. You need to make sure you have a valid payment method for the new country, and that your billing address is correct.
Once you have these things taken care of, you can proceed with changing the iTunes and App Store countries on your iPhone. However, you should note that this can take some time to complete.
In the meantime, you can continue using your existing App Store and iTunes account. Just be sure to use all your store credit before you switch regions.
5. Select a new country
If you’ve moved to a new country and want to use apps or media services that aren’t available in your home region, you may need to change your iTunes and App Store settings. The process can be complicated, though.
To change your iTunes and App Store regions, you must first sign in with your Apple ID password or Touch ID or Face ID. Once you’ve authenticated, select a new country from the list of countries and tap Next.
When you switch countries, your payment information and billing address will be changed, so you won’t be able to access any purchases that you made from your original country anymore. This includes content like music, movies, TV shows, and games you’ve already downloaded to your device or purchased with a credit card.
Before you make the switch, spend any store credit you’ve saved, cancel any subscriptions, and update your billing information for all services associated with your Apple ID account. It’s also a good idea to back up your apps, music, and other content so you can download it again in the new country.
You may not be able to re-download items if you have outstanding refunds, pre-orders, or Season Passes. If you’re in a Family Sharing group, you won’t be able to change your region until the entire group’s members are enrolled in the new country.
To avoid losing your existing purchases, create a second Apple ID with a different address and phone number. You can then switch back and forth between the two accounts. Alternatively, you can purchase an international iTunes gift card and add that to your new account. However, this can get expensive if you need to buy a lot of media and content.


